When managing CRM data, manual updates can cause inconsistencies, errors, and wasted time. Automating third-party data updates solves these issues by ensuring accurate, formatted, and up-to-date records. Here's how to do it:
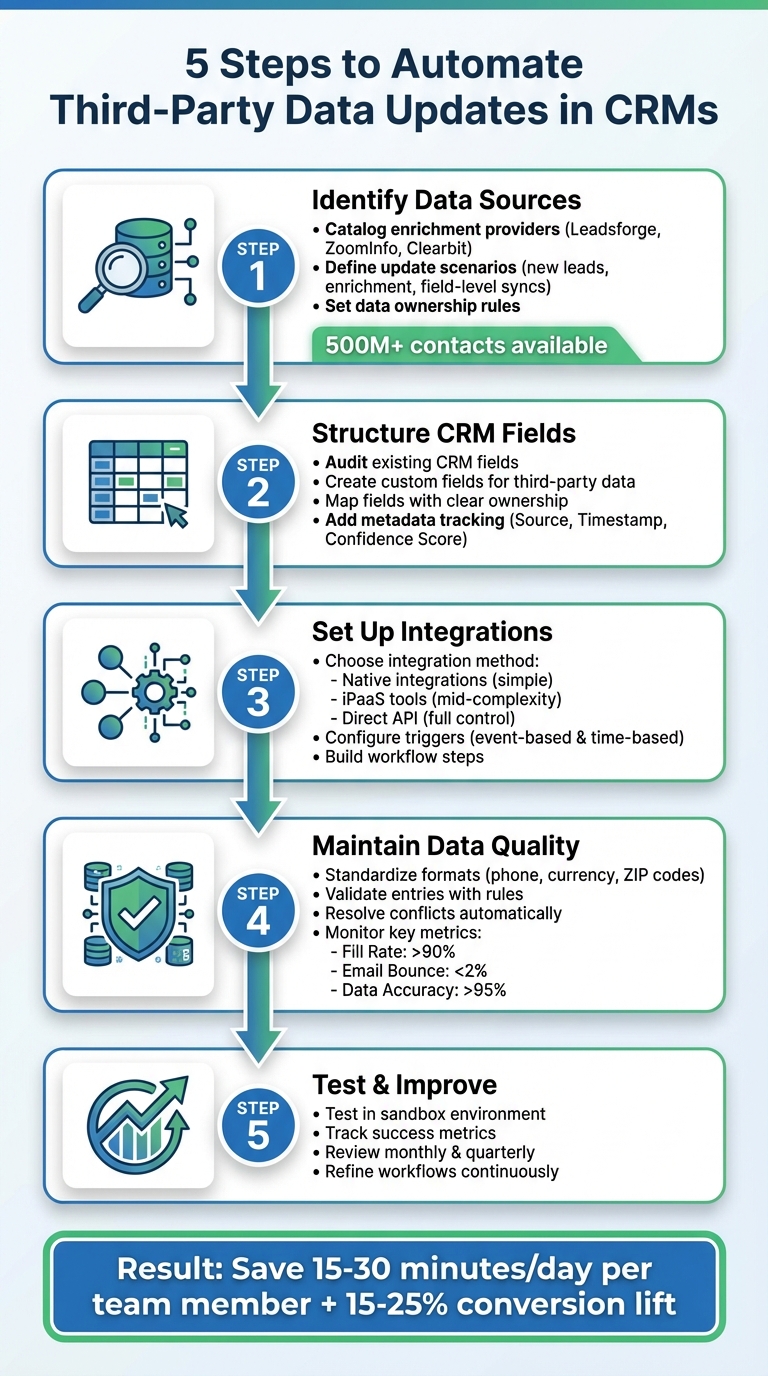
5-Step Process to Automate CRM Third-Party Data Updates
Before diving into automation, it's essential to know where your data originates. Third-party data sources generally fall into three main categories: enrichment providers, intent and behavioral data platforms, and activity tracking tools.
Enrichment providers, such as Leadsforge, ZoomInfo, Clearbit, and Dun & Bradstreet, supply the foundational data that populates your CRM. Leadsforge, for instance, connects to a network of verified B2B data providers, covering over 500 million contacts worldwide. It uses waterfall enrichment to query additional sources until verified data is found. These providers deliver critical details like contact information, firmographics, and technographics. Intent and behavioral platforms monitor online activity - tracking what content prospects engage with or which product comparison pages they visit - and feed scores or insights into your CRM to trigger follow-up actions. Meanwhile, activity tracking tools, like sales engagement platforms or webinar software, automatically log interactions such as emails, calls, meetings, and form submissions, keeping CRM timelines up to date without manual input.
Start by cataloging all the providers you currently use and the types of data they offer. If you're considering new tools, focus on those that align with your ideal customer profile (ICP) in the U.S. For example, check how many companies within your target revenue range (e.g., $10M–$50M) or specific job functions they cover. Tools with native CRM integrations or strong API support are especially helpful, as they reduce the need for engineering resources. Leadsforge, for example, can instantly generate verified lead lists based on natural language ICP descriptions.
Once your data sources are organized, shift your focus to defining the scenarios where automation will eliminate manual work.
After identifying your data sources, the next step is to map out what you want to automate. Common scenarios include creating new leads, enriching existing records, and syncing updates at the field level. For example, when a tool like Leadsforge finds a matching contact, it can automatically create a new Lead or Contact in your CRM. It populates fields like email, phone number, LinkedIn URL, and intent score, and assigns ownership based on territory rules. For existing records, nightly or real-time jobs can match CRM entries using email or domain and fill in missing details - like revenue in USD, job titles, or employee counts - so your sales team spends less time on research. Field-level updates handle changes such as job title shifts. For instance, if a provider updates a contact’s title from "VP of Sales" to "Chief Revenue Officer", your CRM can adjust the field, log the change, or notify the assigned owner for review.
Collaborate with your sales, marketing, and RevOps teams to identify priorities. Ask them which manual updates are most frustrating or which data gaps slow down progress - missing direct phone numbers or outdated titles, for instance, are common bottlenecks. Document the current process (e.g., "SDR searches LinkedIn, copies the updated title, and pastes it into the CRM") and outline the trigger, data source, and desired outcome for each scenario. Then, rank these scenarios based on their impact (e.g., improved conversion rates, faster lead response times, or increased efficiency) and their complexity (e.g., number of systems involved or custom fields required). This process helps you create a prioritized roadmap, such as:
Once you've mapped out your update scenarios, it's crucial to establish consistent data ownership rules. When multiple systems interact with the same CRM fields, conflicts are bound to arise. Ownership rules clarify which system serves as the "source of truth" for each field and when one source can overwrite another. Without these rules, you risk scenarios like a provider overwriting a rep’s carefully verified phone number or a CRM workflow undoing a recently enriched revenue figure.
There are three effective models for managing this:
Document these rules in a concise field-mapping chart that specifies, for each field, the source system, sync direction (one-way or two-way), and conflict resolution logic. This documentation will be vital in later steps, such as mapping fields (Step 2) and monitoring data quality (Step 4).
Here’s a common example of a conflict: your CRM lists "VP of Sales", but the provider suggests "Chief Revenue Officer." If your rules prioritize first-party data (information verified by your team), the CRM value remains unchanged. However, if you’ve set time-based precedence and the provider’s data is more recent, the title is updated, and the rep is notified to confirm the change. Establishing rules like these builds confidence among sales and marketing teams, as they can trust the system to handle data updates reliably and predictably.
Your CRM is built around key objects like Leads, Contacts, and Accounts. Before diving into automating updates from third-party tools, it's crucial to audit these objects. Look at what fields already exist and identify any gaps that could create issues down the line. Pay close attention to critical fields like email, company name, and owner to make sure they're complete and free of duplicates. Starting with a well-structured data model helps prevent small problems from snowballing as automation kicks in.
When incorporating third-party data, it's a good idea to create custom fields specifically for that purpose instead of overwriting native CRM fields. For instance, you can add fields like Company_Revenue_Leadsforge or Employee_Count_ZoomInfo to house enriched data. This keeps a clear line between verified internal data and information pulled from external sources. If you're using a tool like Leadsforge - which taps into a database of over 500 million global contacts through waterfall enrichment - you might want to set up fields for LinkedIn URLs, verified email addresses, mobile numbers, or intent signals. To make these fields easy to identify, prefix them with something like "TP_" (for third-party) or the provider's name. This naming convention ensures anyone reviewing the record knows exactly where the data came from.
Once you've reviewed your CRM fields and pinpointed gaps, the next step is aligning third-party data with your existing structure.
Field mapping is the process of connecting external data to your CRM's structure. For each mapping, document these four key details: source system, sync direction, conflict resolution, and any necessary transformations (like formatting phone numbers to the U.S. standard, e.g., (123) 456-7890, or aligning industry values with your CRM's picklist options).
Start with the basics - fields like Name, Email, and Company - before moving on to custom fields. For example, map a field like Leadsforge_Company_Size to your CRM's Account_Employee_Range field, ensuring values like "500-1,000" align with your CRM's predefined picklist. For revenue data, confirm that it's formatted to match U.S. currency standards, such as $50M or $50,000,000. A best practice here is to separate raw data from verified data. For instance, store unverified third-party information in fields like Raw_Email_ThirdParty while keeping your team's validated data in Primary_Email. This approach avoids polluting core records with outdated or incorrect information and ensures a clear audit trail for compliance purposes.
Once your field mappings are in place, you can take things further by incorporating metadata to improve tracking and transparency.
Metadata fields play a critical role in keeping your CRM organized and auditable. At a minimum, add these three tracking fields:
These fields allow you to run targeted queries, like identifying records enriched more than 90 days ago or flagging contacts with confidence scores below 80%.
Metadata also gives you insights into provider performance. For example, you can build dashboards to track average confidence scores by source. If ZoomInfo consistently delivers scores around 92%, while another provider averages 75%, you now have actionable data to decide whether to switch providers or adjust your data policies. This level of transparency reassures your sales and marketing teams, making it easy for them to see whether a phone number was updated yesterday or six months ago.
After mapping your fields, the next step is connecting your CRM to external data sources. You can choose from three main integration methods: native integrations, iPaaS platforms, or direct API connections. Each option comes with its own advantages and considerations, depending on factors like data volume, update frequency, available IT support, and budget.
For instance, Leadsforge supports multiple integration options, including CSV exports, direct API connections, and data pushes into Salesforge. Its waterfall data enrichment process pulls information from over 500 million verified global B2B contacts, leading to cleaner, more accurate lists compared to single-source tools.
Once you've selected your integration method, the next step is setting up precise triggers to automate your workflows seamlessly.
With your integration method in place, define the specific events or schedules that will trigger data enrichment in your CRM. Triggers generally fall into two categories: event-based and time-based.
Lead Source = Web form, Email is not blank, and Country = United States.
Last Enriched At and Enrichment Provider to track when and how records were last updated.
By carefully defining your triggers, you can ensure your workflows run efficiently and avoid unnecessary processing.
Once your triggers are set, structure the workflow to ensure data flows smoothly and updates accurately. A solid workflow typically includes steps like collecting identifiers, calling the API, processing the response, and updating CRM fields while applying business rules.
$50,000,000), standardize phone numbers to formats like (123) 456-7890, and use USPS two-letter codes for states.Apply field-level precedence rules to protect critical data. For example, you might decide that fields like Phone Source = Sales should never be overwritten, or that the Industry field should only be updated if it’s currently blank. For any conflicting updates, consider routing them to a review queue where sales ops can approve or reject changes before they’re applied.
Finally, keep a detailed log of all changes. This should include the previous value, the new value, the source of the data, and a timestamp (formatted as MM/DD/YYYY for U.S. consistency). Implement retry logic and set up alert notifications to address any API errors quickly and minimize disruptions.
Once your field mappings are in place, the next step is to enforce consistent data formats like currency, email, and phone numbers. This ensures your CRM remains clean and functional. For example, you can apply validation rules to catch errors before they enter the system. In the U.S., you might require phone numbers to follow formats such as (XXX) XXX-XXXX or +1-XXX-XXX-XXXX. To enforce this, use a regex pattern like:
^\(?([0-9]{3})\)?[-. ]?([0-9]{3})[-. ]?([0-9]{4})$
Similarly, ZIP codes should be validated to ensure they are either 5 digits (e.g., 90210) or in ZIP+4 format (e.g., 90210-1234) with a pattern like:
^\d{5}(-\d{4})?$
For currency fields, display amounts in USD with proper formatting (e.g., $1,234.56) and ensure two decimal places are included. Records that fail these standards or contain more than 20% missing data should be rejected automatically and flagged for review in a "Data Review" queue. In platforms like Salesforce, you can create validation rules to block entries that don’t meet specific criteria, such as an email missing an "@" symbol or a domain that doesn’t match the company record.
Take Leadsforge as an example: they maintain high data accuracy by integrating multiple verified B2B data providers. Their process includes real-time email validation, LinkedIn URL checks, and strict phone number formatting, which leads to better match rates and cleaner records.
Once your data formats are standardized, the next step is to address conflicts with clear resolution rules.
When data from third-party sources disagrees with existing CRM records, you’ll need clear rules to decide which value to keep. For instance:
These rules should be documented in your field mappings (from Step 2) and supported by detailed audit logs. Each log entry should capture the old value, new value, data source, timestamp (MM/DD/YYYY), and the trigger (whether user or system). Regularly reviewing these logs through dashboards can help identify recurring issues and highlight areas needing improvement.
Once conflict resolution rules are applied, it’s essential to continuously monitor both data quality and the performance of your data providers.
To ensure your system remains reliable, track key metrics that measure the quality of your data and the effectiveness of your providers:
Set up automated dashboards in your CRM to calculate these metrics in real time. For example, you can use formulas like COUNTIF(enriched fields)/total records. Configure alerts to notify you if any metric strays too far from its target. Conduct weekly scans to compare the performance of providers like Leadsforge, ZoomInfo, and Clearbit using tools such as Validity or Insycle. For Leadsforge specifically, pay attention to the accuracy of intent signals and review these quarterly to ensure you’re consistently receiving high-quality, verified data.
Once you've set up your field mappings and conflict rules, it's time to test everything in a controlled environment. A sandbox is ideal for this. Use a sample dataset that includes edge cases to ensure your triggers, conflict rules, audit logs, and reporting mechanisms are all functioning properly. Run full workflow tests - this means testing how enrichment triggers are activated, how conflict rules are applied, verifying ownership assignments, and ensuring lifecycle processes remain intact. Compare field values before and after automation to confirm accuracy, review audit logs for any anomalies, and make sure reporting and segmentation tools are working as expected.
If a full sandbox isn’t available, start small with a limited scope in production. For instance, test within a single sales territory or campaign. Monitor the results closely for a few days before rolling it out further.
Once you’ve confirmed everything operates as intended, shift your attention to measuring the impact of your automation.
Now that your integrations are live, it’s important to measure their performance and make improvements over time. Keep an eye on weekly efficiency metrics, such as the number of fields that are automatically populated. Post-launch, track key indicators like field completeness (aim for over 90%), email bounce rates (keep them under 2%), and how well your records meet standardization rules. To tie automation to business outcomes, compare metrics like lead-to-opportunity conversion rates, opportunity win rates, and the average length of your sales cycle before and after launch. You can even calculate the monetary value of saved time by applying standard hourly rates to the hours freed up by automation.
| Success Metric | What It Measures | Example Target |
|---|---|---|
| Field Completeness | % of records with key fields populated | >90% |
| Email Bounce Rate | % of invalid or undeliverable emails | <2% |
| Time Saved | Hours per week freed from manual updates | 10–20 hours |
| Conversion Lift | Change in lead-to-opportunity conversion | +15–25% |
If you’re using a platform like Leadsforge, also monitor list accuracy and how enriched leads progress through your qualification stages.
Once you’re tracking success metrics, make regular reviews part of your process. Set up monthly check-ins to evaluate error logs and key data metrics, and create a system for gathering feedback from your team. Look at workflow logs and dashboards to identify recurring issues, such as enrichment failures tied to certain industries or regions. Every quarter, go deeper: reassess your field mappings, conflict-resolution rules, and the source-of-truth systems for different data types - especially if your sales processes, territories, or product lines have changed.
It’s also critical to review provider performance. Check match rates, enrichment coverage, response times, and the quality of support on a weekly basis. Bring in RevOps and other key stakeholders for regular review meetings to prioritize updates that can improve your pipeline and team productivity. If you’re using an AI-powered provider like Leadsforge, incorporate its performance metrics into these reviews. Fine-tune your settings so your CRM always reflects the most accurate and relevant third-party data.
Automating third-party data updates creates a system that saves time, improves accuracy, and lets your teams focus on driving revenue. By following five key steps - pinpointing your data sources, designing a clear data model, setting up integrations, ensuring data quality, and testing regularly - you can build a scalable process that transforms your CRM into a powerful growth tool.
Teams that embrace automation benefit from more complete records, fewer errors, and sharper targeting and segmentation. Instead of spending 15–30 minutes a day manually transferring data from spreadsheets or websites, your team can dedicate that time to discovery calls, outreach, and closing deals.
To get started, focus on a high-impact use case, like enriching inbound leads with verified contact information. Begin with a pilot program for one team, track your results, and expand from there. Use built-in CRM workflows or integration tools to keep costs manageable while speeding up implementation.
For AI-driven lead generation with automated enrichment, check out Leadsforge. It pulls from multiple verified B2B data sources using a waterfall approach to deliver the most accurate, real-time data. With native integrations for outreach and CRM platforms, Leadsforge acts as a continuous enrichment layer, keeping your records up-to-date without the need for manual input.
Think of automation as an evolving process. Regularly review performance, schedule quality checks, and fine-tune your rules as your needs shift. These efforts can turn your CRM into a dynamic, always-current tool that drives growth.
When automating your CRM, keeping data accurate and reliable is crucial. Start by validating essential details like email addresses, LinkedIn profiles, and phone numbers in real time. Incorporate verified, multi-source enrichment to improve the accuracy and completeness of your data. Additionally, make it a habit to test and monitor workflows regularly - this helps you spot and fix inconsistencies early, ensuring your CRM stays dependable and up-to-date.
To integrate third-party data into your CRM effectively, the first step is establishing reliable API connections to ensure smooth data transfer. Incorporate real-time validation to confirm data accuracy and reduce the need for manual input by automating workflows wherever possible. Before launching, conduct thorough testing of the integration to catch and fix any potential issues. It's also crucial to implement strong security measures like OAuth to safeguard sensitive information and routinely monitor the integration's performance to address any emerging challenges.
Platforms such as Leadsforge can simplify this process by automating data enrichment and enabling direct exports to your CRM, saving you time and boosting overall efficiency.
To tackle data conflicts effectively, start by prioritizing verified, up-to-date information from reliable third-party sources. Set up automated workflows in your CRM to apply conflict resolution rules - like giving preference to the most recent or trustworthy data. Regular database audits are another great way to spot and fix inconsistencies before they become larger issues.
Tools such as Leadsforge can make a big difference. By validating and enriching data in real-time, they help minimize conflicts and keep your CRM accurate and consistent.